
There is little as exhilarating as finishing a tough trail on your bike with a couple of friends or your family by your side. But, unfortunately, this feeling can quickly diminish when you’re struggling to get your bike back into your vehicle or even having to take it apart.
That’s why you need to choose the best Yakima bike rack today; you’ll find it is so much easier to get your bike to and from where you want to be. After all, you can’t ride the same circuit around your house every weekend!
Having a Yakima bike rack means you’ve chosen a quality product that will last you for years and make your life so much easier in the process. It also opens up opportunities regarding where you can cycle and how far you can push your limits.
Best Yakima Hitch Mount Bike Rack
If you have the hitch on your car, then the Yakima Ridgeback Hitch Bike Rackmount style offers the best balance of accessibility, security, and even style; you’ll struggle to beat the Yakima Ridgeback.
Best Budget Yakima Bike Rack
If you are simply on budget and looking for a convenient way to store your bike in your truck or garage, then the Yakima BlockHead Bike Fork Mount is the right solution for you.
Best Heavy-duty Yakima Bike Rack
This Yakima FullSwing 4 Bike Hitch Carrier is a 4 bike carrier that looks fantastic! It’s a little on the beefy side, which tells you that it’s capable of getting the job done.
As a company, Yakima is dedicated to providing you with the very best equipment that will allow you to connect with family and friends. In short, they will enable you to carry all the gear you need, keeping your vehicle free for you and your family/friends.
Yakima started life as a small machine shop in Yakima, Washington, nearly 40 years ago. Under the guidance of Steve Cole and Don Banducci, the company has grown dramatically.
By 1984 they were creating aerodynamic fairings for race vehicles at the 1984 Summer Olympics. But that’s not their only claim to fame. They also designed and named QTR, the Q towers that hold the crossbars in position on your car. They were designed in 1995 but are still in use today!
They are still going from strength to strength, having introduced an extensive range of racks and now teamed up with Toyota as the official sponsor of the Road Warrior team. This is a company with a future, just like your Yakima bike rack.
Yakima Bike Rack .v.s. Your Vehicle
It can be difficult to decide which Yakima bike rack is the right one for your needs, especially when some options look so good! Fortunately, it can be easy to narrow down the choices if you know what you really want to do with your bike rack.
Just as there are many different vehicles on the market, you’ll find that there is a Yakima bike rack to fit each one. That’s why you must understand the different types of bike racks on offer. This will help you to select the one that best suits your vehicle; as well as your needs:
The Hitch
You won’t be surprised to learn that you need a tow hitch on your vehicle to fit a Yakima hitch bike rack.
The idea is that they are easy to fit as they slide straight into your hitch receiver and lock into position. In addition, they are usually straightforward to fit and close to the ground, which makes it easier to lift the bikes into position.
However, you should note that the hitch-mounted rack is usually the heaviest rack to lift by itself and adds a considerably extra length to your vehicle. But, most of these style racks utilize ‘swing away’ technology. This allows the rack to tilt or swing away from your vehicle, even with the bikes in position. You can then easily access the trunk.
There are two main sizes of hitch receivers, 1 ¼” or 2”. In addition, you’ll find that it is easy to purchase an adaptor from the Yakima accessory range to ensure your chosen Yakima bike rack hitch connects properly.
It is also important to be aware that some hitch-style bike racks will leave you hitch-free, allowing you to tow a trailer or caravan simultaneously. You’ll need to choose carefully if this is an important option for you.
Trunk Mounted
One of the cheapest and most popular options with those who use their racks occasionally is the trunk-mounted rack.
These racks have been placed on the rear windscreen or trunk and tied in place in the past. Modern racks, especially those from the Yakima bike rack range, use clips to secure the rack onto the trunk, helping to ensure it stays exactly where you put it throughout your journey.
Of course, trunk-mounted bike racks do not generally allow you access to the trunk; even with the bikes off the rack can make your trunk lid too heavy for any hydraulic openers.
On The Roof
If you haven’t got a hitch and you are worried about visibility, or trunk access, then you’ll probably want to choose a roof-mounted bike rack.
You’ll generally need to have crossbars already fitted to your vehicle. If you haven’t got these, then you’ll need to get some fitted. The roof bike rack will then clamp to the two crossbars, and your bike will fasten to the rack.
However, you will need to lift your bike up and onto the roof, which could be an issue if it’s a heavy bike. You should also be aware that some of these style racks need you to remove the front wheel; that means you’ll have to store it somewhere.
Spare Tire
If you have a 4×4 or similar vehicle with a spare tire on the back, you can get a Yakima spare tire mount. This fits over the spare tire or bolts through the same hole as the tire mount. You shouldn’t need to remove the spare tire during fitting.
This is quite simple to fit and surprisingly practical. But, it is usually only suitable for 1-2 bikes, and you do need a spare tire on the rear of your vehicle!
Truck Bed
Finally, if you’ve got a truck, you can actually use the truck bed to carry your bikes. This is great if you’re not carrying any gear or need to keep your tow hitch-free.
Of course, you can put your bike in the back of your truck. But, using a proper truck bike rack will help to ensure that your bike doesn’t move around while you’re in transit. Also, a sliding bike can cause a lot of damage to your truck and your bike.
Most truck beds should be capable of carrying up to 4 bikes.
10 Best Yakima Bike Racks:
There are many different Yakima bike rack options available, you need to check out this guide in order to find the best one for your needs!
1. Yakima Ridgeback Hitch Bike Rack


The first and potentially the best offering on this list is the Yakima Ridgeback. There is no doubt that this is a good-looking rack. At first glance, it’s simply a silver stick with black ends and a large red button.
But, take a second look, and you’ll see the slight curve that adds strength and gives it an understated but noticeable stand.
The Ridgeback is designed to slide straight into your hitch receiver; an adaptor is included to ensure it fits 1.25” and 2” receivers. So if you need the adapter, you slide it into the hitch before you slide the rack into place.
Once you’ve positioned the rack, you’ll notice a tool-free speed knob that you turn to secure the rack. It has a built-in anti-sway mechanism to minimize movement while you’re driving. Once you’re happy, the rack is in position and secure; you can slide your key into the red triangle at the bottom of the rack; this allows you to lock the Ridgeback to your vehicle, preventing anyone else from removing it.
Locking the rack in position is a real bonus because it is so small you can leave it on all the time or forget to remove it. At least you’ll know it’s still going to be there when you need it.
The Ridgeback Yakima bike rack is designed to take 2 bikes. However, there is also a 5 bike option if you need to carry more bikes; that covers most families. A U-shaped cradle comes out from the top of the rack; this can be folded in when you’re not using the rack to prevent you from hitting something when reversing. Each of the arms of this cradle has 2 anti-sway cradles; they can be moved in any direction to help you find the perfect spot for your bike; the frame should drop into these cradles.
Once in position, secure the ZipStrips, and your bike is ready to roll. It is worth noting that the Ridgeback Yakima bike rack comes with a Tubetop crossbar adaptor. This can be useful to help secure your bike, especially if it doesn’t have the conventional straight bar.
You’ll also notice a lever at the top of the bike rack. Pulling this will allow you to tilt the entire rack away from the vehicle. This shouldn’t be sufficient enough to enable contact between the bike and the ground but it will allow you to access the trunk.
The rack is designed to carry two bikes of no more than 45lbs each; that should be enough for most bikes. It is worth noting that there is no locking mechanism to secure your bikes to the rack. If you think you’ll be leaving your bikes for any length of time, then you need to purchase a cable lock separately and wrap it around your bikes and the rack. This cannot be easy to do without being able to slide the locking cable straight back off. Think carefully before you positioned and secure your lock.
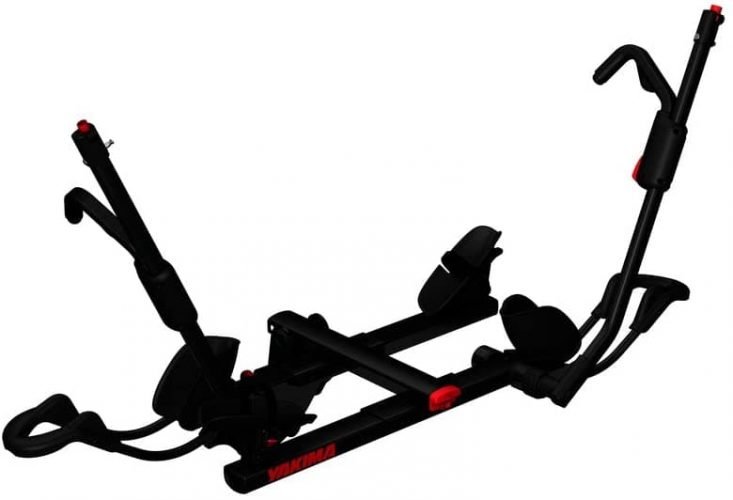
2. Yakima FullSwing 4 Bike Hitch Carrier

This is a 4 bike carrier that looks fantastic! It’s a little on the beefy side, which tells you that it’s capable of getting the job done. In addition, the slight curve in the main bar and the word Yakima outlined in red up this bar really make it stand out; for all the right reasons.
It’s another hitch-mounted option but worth looking at, especially if you need to carry 4 bikes! This Yakima bike rack is 43 inches long, sits at 26 inches wide, and is 17” tall. Of course, being built to take the weight of 4 bikes means that it is relatively hefty itself, weighing 56 pounds. You’re going to need to feel strong the day you fit it or enlist the help of a friend.
Each of the bikes you out onto this Yakima bike rack should weigh no more than 40 pounds.
Top Tip: If you’re struggling with withholding it and lining it up, try placing the rack on another object to help hold its weight; you can then slide it across the floor to meet the receiver on your vehicle. An old golf or shopping trolley could really help, or even the pushchair!
The Highroad will fit both 1.25” receivers and 2” ones with the other Yakima bike rack hitch mounts on offer.
But, perhaps the greatest benefit and reason to choose this rack over the other options is the automatic pin seating. All you need to do is slide the rack into the hitch receiver and push down on the grey button; the rack will ensure the pin is in the right place and drop it into position, holding your Highroad secure. This goes a long way to compensate for the necessary weight of this rack.
Once the rack is positioned and the pin has dropped, you can lock it onto your hitch; turn the lock built into the red triangle at the bottom of the main bar.
Just as with the Ridgeback, there is a U-shaped bracket at the top of the main bar; of course, this extends further as it is designed to support 4 bikes. The entire rack is made from steel and powder coated to protect the finish. Each of the extending bars has 2 anti-sway cradles. Again, these can be moved to help accommodate your frame type.
There are 4 cradles on each arm but only 2 are anti-sway; these are the ones that take your front wheels.
As soon as the frame is in the cradle, you can pull the ziplock straps into position and secure the bike; it won’t move as you drive. The next bike should really have the handlebars at the opposite end to the first; this will ensure the bikes are packed as closely together as possible.
Although they shouldn’t move or hit each other, you may wish to consider adding an extra cable around the lower part of the bikes; it will ensure they are snug and cannot move.
The lever at the top of the rack can be pulled upwards; this will allow you to fold the U bracket down and lock them against the frame, minimizing the size of the rack when you’re not using it. You’ll also notice a lever at the bottom right of the main bar; this can also be pulled up, allowing the rack to swing away from your vehicle and giving complete access to your trunk.
The great thing is that no tools are needed for any of these processes, making it very easy to fit and use at any and every opportunity.
Finally, a cable lock is incorporated into one of the arms; turn your key, pull the cable out, wrap it around the bikes, and then lock the end back onto the rack. It will keep your bikes secure in most situations.
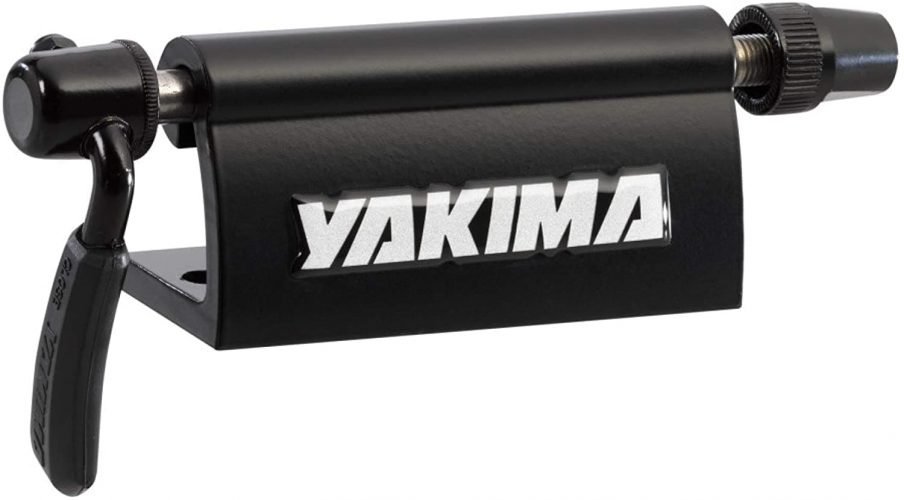
3. Yakima BlockHead Bike Fork Mount
All the above Yakima bike rack offerings are great if you have a car or similar style vehicle. But, if you have a truck, you may not find any of these options useable, and you really don’t want to throw your bike into the back.
The Blockhead Yakima bike rack is an excellent option for your truck bed or for storing your bike at home.
This is a tiny device, measuring just 2” x 4” x 7”; it is designed to clamp onto the forks of your bike and prevent it from moving; you will need to remove your front wheel to use this. If you have a quick-release wheel, then this shouldn’t be an issue, but you may want to consider some of the other options on this list if you don’t have a quick-release wheel.
The blockhead is designed to bolt onto a flat surface; this means you will be drilling holes in your truck bed. Alternatively, you can secure it to some wood and secure that to existing holes in your truck bed. You can also secure it to concrete or other floorings, giving you a place to keep your bike at home without risk of it falling over.
Once you’ve drilled the holes and bolted your blockhead into position, you can remove the front wheel from your bike. The forks should sit on each side of the blockhead. The pin that goes through the blockhead can then be tightened against the forks; in the same way that the wheel usually is. Once tight, the bike will be secure and cannot be moved. The skewer that slides through and clamps on your frame is long enough to accommodate most fork sizes; that’s a real bonus.
However, it is worth noting that this will not lock the bike into position, and nothing will lock the rack to your truck bed. The surface you choose to use should also be flat to ensure the rack sits evenly and holds your bike in place.
While this should be enough to secure your bike in the rear of your truck, you may wish to consider adding a padded locking cable to the rear of your bike; this can prevent it from being stolen and help to stop it from moving around while you’re driving.
Of course, depending on the size of your truck, you can fit several of these in to make it easier to carry all your bikes. Don’t forget that you’ll need to keep your front wheel somewhere, too; you don’t want it bouncing around as you drive.
4. Yakima Fullback Trunk Mount Bike Rack

If you don’t have a hitch, then you’re going to want to take a look at the Fullback; it’s a trunk-mounted Yakima bike rack and a perfect one!
The first thing you’ll notice is that it looks good. This is partly because the steel frame has been powder coated and literally gleams. It is also partly because the arms are curved and look good. But, there is a reason for this. Above making the rack look good, it blends better with your vehicle’s style and provides better aerodynamics than traditional trunk-mounted bike racks.
It measures 25” wide x 22” tall and comes in 2 options, a 2 bike version 28” deep and a 3 bike offering with an extra 4 inches, making it 32”. The 2 bike rack weighs in at a surprisingly light 20lbs, while the 3 bike version is just 3 pounds more at 23 pounds.
The rack has 4 straps attached to it; these have rubber-coated hooks on end, and the length of each one is adjustable. The idea is that you open your boot and place two hooks over the base of your trunk, with the other two at the top of your trunk. You can then tighten the straps to ensure the rack is in the right position and can’t move in any direction.
The straps shouldn’t come loose in transit. But, if you take a long journey, you may feel safer adding a knot into the strap just below the adjustor; this will prevent the straps from loosening.
You can then close the trunk, the hooks won’t interfere with the closing, but it will be nearly impossible to remove the rack without opening the trunk; unless you cut the straps!
Two arms extend from the back, which can be folded into your rear window when the rack is not in use. Each arm has 2 or 3 brackets, depending on which rack you’ve chosen. These are designed to accommodate your bike and can be moved to get the optimum position. The arms are well padded to help protect your bikes and your vehicle; there are also large rubber mounts that sit against your vehicle, preventing the rack from coming in contact with it.
If you’re carrying a lady’s or children’s bike, you can get a frame adaptor that will give it a conventional top bar, making it easier to mount them to your rack.
In addition, you’ll find that there is a cable lock built into the end of one of the arms. Unlock it and wrap it around your bikes before locking it back into position. It may not deter every thief as it is possible to cut the straps on the Fullback 2, but it will prevent most opportunists from walking off with your bike while you run into the store.
You should note that nothing is stopping you from opening your trunk while the rack is fitted. However, you may find it very heavy with 2 or 3 bikes on the rack and, even an empty rack could prove to be too much for the hydraulic supporting arms.
Don’t forget, each bike should weigh no more than 30 pounds.
5. Yakima FrontLoader Rooftop Bike Rack

The name of this rack may not give away that it is actually a roof Yakima bike rack. The look of it probably will as it appears to be little more than a slim stick with space for a ski boot or something similar to be attached.
The good news is that it requires no assembly. The bad news is that you need to have crossbars fitted to your vehicle.
If you have roof rails already then, you can purchase Yakima crossbars and the right fitting kit for your car. If you don’t have any roof rails, then you’ll need the crossbars and towers; the exact type will depend on your vehicle as you may have flush rails, raised rails, no rails, gutter, or even need to clamp above the door! The Frontloader will fit Yakima round bars, square ones, aerodynamic ones, and even factory bars.
Don’t worry. The Yakima site will help you establish which system works best for your vehicle, but it will increase the cost of this rack.
On the plus side, this rack is very slim; you could carry 3 or 4 bikes on your roof, or 1-2 and a kayak, helping you to stay active on that family vacation!
A simple U-style clamp system will allow you to fasten the Frontloader to your crossbars easily. Unbolt the clamps, place one piece on each side of your crossbars and then tighten them back up with the special tool send with the rack; this reduces the risk of someone stealing your Frontloader.
You can also order SKS locks separately and then use these to secure your Yakima bike rack to the roof.
This rack is 56” long, just 7” wide, and 7.5” high; it weighs an impressive 13 pounds, making it very easy to lift onto your roof and secure into position. Your crossbars will need to be between 16 inches and 48 inches apart. That should be enough to cover most vehicles. But, if, for any reason, your bars can’t be adjusted to within this range, then you won’t be using the Frontloader.
Securing your bike into position is surprisingly easy. The bike wheels sit in the groove, and they can accommodate wheels between 20” and 29” but not fat wheels.
The zip lock style strap goes over the rear wheel while the front of the rack lifts upwards, creating a groove for the front wheel to sit in. Once it’s in the position, you simply tighten the oversized knob, and the wheel is clamped in position between the front two bars, which creates a V round it. Once tight, the wheel cannot move, and the bike is secure.
You’ll be pleased to note that the SKS locks sold separately actually fit into the frame of this Yakima bike rack, allowing you to secure the bike with a cable to the rack; that should be enough to deter most opportunists.
This Yakima bike rack can support bikes up to 40 pounds in weight, and you can add several racks to your roof, providing you stay within the guide weight limit for your roof. You also need to remember that the bikes are on the roof, especially if you’re going under a bridge or into a restricted-height car park!
6. Yakima Hold Up Tray Style Bike Rack
With the Hold Up 2, we’re returning to the hitch-mounted bike rack. In fact, this is arguably the Yakima bike rack that can be fitted and ready to go the fastest. That makes it a great rack but not necessarily the right one for you!
It is worth noting that this is also one of the most expensive Yakima bike rack offerings available.
The Hold Up 2 weighs 49 pounds, measures 64” wide, 34.5 inches tall, and is 12” long. It comes ready to fit your vehicle and is the perfect solution for a heavy bike. It can accommodate 2 bikes up to 60 pounds each. You can even get an additional hold up, which will allow you to take a further 2 bikes; that makes it a truly flexible option.
This isn’t as pretty to look at as some of the other Yakima bike rack hitch mounts. But, it is very functional and efficient; it also has a low ride height, helping you lift your bike into position with a minimum of fuss.
The hitch can slide into a 1.25” receiver or a 2” one; the adaptor is included. Once in position, you tighten the threaded hitch pin; this will stop the rack from moving as you drive. However, it is worth noting that the pin must be fully tightened with a wrench. There is no extra large knob or lever on this rack. Although you may want to replace the threaded pin with one that locks into position, this could be considered an issue. However, it is worth noting that the wrench and threaded pin are unique; you’ll struggle to get it out without the wrench.
Once secure, you can lift your bike into position. The tray that the bike sits in slides; hold the button in and extend the tray as wide as you need it so that the wheels sit in the indicated grooves. The rear wheel clamp has a standard zip-lock strap that holds it firmly. In contrast, the front wheel sits between two clamps that adjust according to the size of your wheel; the rack can handle wheels between 20” and 29”.
There is also a bar with a U-shaped top that goes over the front wheel. If you push the button on the top of this bar, you’ll be able to extend it upwards; this will make it easier to fit the wheel into position. You can then slide the bar back down until it clasps firmly onto your tire. The bikes sit in opposite directions. The front of one is next to the rear of the other; this will prevent the bikes from touching each other or the rack; keeping everything safe in transit.
You can tilt the Hold Up 2 out of the way, allowing you access to your trunk. A pin does this near the base of your rack; it’s spring-loaded, so be careful! Pull it up, and the rack will tilt, but the bikes shouldn’t come into contact with the ground!
But don’t forget that there is no mocking mechanism included in this Yakima bike rack. It’s a good idea to purchase a locking cable and wrap it around the bikes and the rack; that should help keep your prized possession safe.
7. Yakima DoubleDown 4-Bike Hitch Mount Rack

The Yakima Doubledown has a simple design consisting of a steel post that has been powder coated and has the word ‘Yakima’ emblazoned on it in white. The top of the post has a red button set into it; this allows the twin arms to be lowered down against the pole, an excellent feature if you intend to leave the rack in position for any length of time. It can even help if you’re parking in a tight spot after unloading the bikes.
The rack itself is 44” high, 36 inches long, and 14 inches wide; it’s big enough to accommodate 4 bikes; each should weigh no more than 35 pounds. This Yakima bike rack is also hitch mounted; this is becoming the most popular way of carrying bikes. It fits onto a 1.25” receiver or the larger, 2” one.
Slide the rack into the receiver on your vehicle and drop the installation pin into position and tighten. At this point, it should be noted that the rack does come in pieces but that everything you need to put it together is present; you should be able to complete the process within 30 minutes.
There is a safety clip; this will ensure your rack doesn’t fall off if the pin should fail for any reason.
A lever at the bottom of this rack can be pulled upwards, allowing you to tilt the rack away from the vehicle and gain access to the trunk. This can be done whether you have bikes on the rack or not.
Each of the bars extending out of the rack has 2 anti-sway cradles and 2 standard cradles. The anti-sway is for the front wheels of your four bikes; they should be positioned in alternating directions to maximize the available space on your rack. It is worth noting that some people have found it very difficult to get 4 bikes on one rack.
Once your frame is in the anti-sway cradles, you can fasten the ziplock over it to secure them. The rear frame then slots into the cradle supplied, and, again, the ziplock can be tightened over it. The bikes shouldn’t move in transit. However, you will notice that there is no locking mechanism with the Doubledown Yakima bike rack. You can purchase a locking cable and wrap this around the bikes and the rack. If you do this on the lower part of the bikes, you’ll ensure the bikes cannot move while you’re driving; be sure that the locking chain has padding to protect your bikes!
You may be interested to note that this rack has a bottle opener built into it. This is actually a feature of most Yakima bike racks, alongside the lifetime warranty for the first owner.
8. Yakima SpareRide 2 Bike Carrier Rack

If you’ve got a spare tire on the back, then this is the perfect bike rack for you! Most vehicles that have spare tires on the rear will probably be too tall for a roof bike rack, and you may not have enough clearance to accommodate a hitch-mounted Yakima bike rack, although the Backswing can help with this.
Even trunk-mounted bike racks are not usually an option in this scenario; hence you’ll need to invest in the Spare Ride. It has a straightforward design consisting of one pole and two arms, extending in the classic U style. In many respects, the design is similar to a hitch-mounted rack, and the difference is in how the rack is fitted to your vehicle.
Fitting does take a few moments, but it’s worth it! First, you’ll need to remove and discard any spare wheel cover, and it can’t be used at the same time as this Yakima bike rack. You’ll then need to unbolt the spare wheel. You can remove the plate from the bike rack and place this against the mount, where the spare wheel normally sits. You’ll find several adaptors that can be screwed to the front of this plate to ensure your main pole fits in the right spot.
Once positioned, put your spare wheel back into position and bolt it back onto its cradle; this will hold the mounting plate in position.
All you need to do is slide the bike rack onto the extending square bolt and screw the red know into pace; through the bike rack. Do this tight and then use the inbuilt lock to secure the rack, preventing anyone from walking off with it.
That’s it, your Spare ride bike Yakima bike rack is ready to use, pull the lever on the top to swing the arms up, and then use the standard cradles to hold your bikes in the right position. There are two cradles on each arm, each with ziplock straps to hold your bike securely.
It is important to note that you’ll need a separate locking cable to secure the bikes to the rack.
This rack is designed to fit virtually any spare tire; it has Tiretread pads that protect your vehicle and bikes, as well as increased stability. It is made of powder-coated steel and will last for years, providing you look after it. You may be surprised to discover that it only weighs 21 ½ pounds despite being 40” long, 13” wide, and 19” high!
As with most Yakima bike rack products, you’ll get a lifetime warranty for the first owner against defects.
You may have a vehicle with a spare tire, but that shouldn’t stop you from carrying your bikes and enjoying the great outdoors, even if it’s a soft-top Wrangler.
9. Yakima Halfback 2 Bike Carrier Rack

This stylish rack is available in silver and black, ensuring it will be the perfect accompaniment to your vehicle. In fact, in many ways, it is similar to the Fullback 2.
Both racks have powder-coated modern curved designs that actually complement your vehicle as opposed to just sitting on the back. Again, it’s a trunk-mounted rack with 4 straps; ideally, these are used as anchors to the top and bottom of your trunk. The clips are designed to sit around the trunk lid. Tightening the straps once they are in position ensures they stay in place. The system is designed to fit around spoilers and fit a wide variety of vehicles; you may need to adjust where the straps are hooked. If they’re secured properly, they won’t move while you’re driving.
Each arm extends with 2 cradles; designed to accommodate most frame sizes; they are movable to create the perfect position for your frame. Of course, you can purchase the tube top bar to ensure all bikes hang by a top bar, whether they have one or not. It’s worth noting that this comes with the Fullback; it’s an extra on the Halfback.
The Halfback measures 32.7” x 23” x 23.2” and weighs 23.5 pounds. Interestingly this is very similar but not the same as the Fullback. It’s also important to know that this rack is designed for 2 bikes; there isn’t a 3 bike option.
The same level of padding has been applied to the frame, ensuring your vehicle is protected. In addition, you’ll find the cradles are soft and anti-sway, limiting the chance of damage to your vehicle or your bikes. Of course, you may still want to add an extra cable to pull the lower part of the bikes in tight to your vehicle.
As usual, there are zip strips to secure the bike in place; all you have to do is lift it onto the cradle and push each zip strip cable through tight, locking the frame into position. The bike won’t move up and down even on the bumpiest of roads.
The biggest difference is insecurity. The Fullback has integrated locks, and the Halfback doesn’t. This means you’ll need to purchase a cable lock that can be fitted around the bikes and the rack to reduce the chances of your bikes being stolen while you’re parked.
Of course, it is relatively easy to cut the straps securing the rack to the vehicle; you may want to loop the cable lock through the bike rack and onto another part of your vehicle, such as roof rails if you have them. However, you may want to consider using a rooftop bike rack instead if you have roof rails.
In essence, this is a cheaper offering to the Fullback and is a great option for anyone who uses a rack occasionally and isn’t worried about the chances of their bikes being stolen.
10. Yakima ForkLift Fork Mount Rooftop Bike Rack

The final offering on the best Yakima bike rack list is another roof mount option. Again, this is the best option if you don’t like having anything in your rearview mirror; both trunk-mounted, hitch mount, and even spare tire mount, will obstruct your view through the rearview mirror.
It is important to remember that you can’t use a roof-mounted bike rack unless you already have crossbars fitted. The good news is that this Yakima bike rack will fit virtually any crossbar, whether it’s a Yakima product, factory fit, square, circular, or even aerodynamic; all you need is the bars.
The Forklift weighs an impressive 7 pounds; it is 53.5 inches long and 2.5 inches high. You’ll barely even notice the fact that it’s just over 7 inches wide! You’ll find it effortless to lift this onto your roof, and you can even put several of them on your roof. But, it is important to consider the weight of your bike when fitting a roof bike rack. This rack can handle bikes up to 40 pounds, but you’ll have to lift that bike into position.
Your crossbars will need to have a spread of between 16” and 42”; if you have more or less than this and can’t adjust them, then this rack is not going to fit.
Securing the rack into position is very easy; lift it onto your roof and then slide the tray to line up the clamps with your crossbars. Once they are in the position you can release the underside of the clamp and then reattach them around the bars. As soon as you’ve fully tightened these into position, the rack will be secure and ready to use.
You can then lift your bike into position, and it will accommodate wheels between 20” and 29”, although it can’t accommodate anything over 3.5” wide. The rear wheel has a standard zip-lock cable that fastens securely around the wheel. However, the front needs to be secured via the forks; you’ll need to remove the wheel. Ideally, this should be done before you lift the bike!
The front works slot into pre-determined spaces on the roof bike mount. You can then tighten the pin-up to secure the frame in the same way that you would tighten the wheel back into place. Once you’ve got it tight, you’ll notice there is a keyhole in the pin. Locking this will prevent anyone from being able to remove the pin, making your bike safe.
You can add as many of these carriers to your roof as you can fit, but don’t forget that your roof will have a weight limit. Make sure you adhere to this to ensure you don’t have any unwanted or unfortunate incidents. Of course, as with the other Yakima bike rack for your roof, don’t forget it’s on there when you’re driving; a low bridge or similar obstacle could destroy your pride and joy!
If you’re looking at bike racks from Yakima, then you’re already on the right track; few manufacturers offer such a good range of quality products. As a result, you will be able to find the right Yakima bike rack for your needs.
However, it is important to remember that the best rack for your friends is not necessarily the same as the best one for you, no matter how cool it looks.
It would help if you took a few moments to consider the following points; this will help to ensure you purchase the right Yakima bike rack for your needs now and in the future.
Your Plans
Before you consider the best Yakima bike rack for your needs, you should take a moment to consider how often you use a bike rack and, more importantly, how often do you change your vehicle.
If you’re one of those people that likes to change their vehicle every year or two and you’ll probably be changing it soon, you need to consider whether you’re likely to have the same style of vehicle or not; it can affect the type of bike rack you choose to purchase.
Maximum Number Of Bikes You Need To Carry
It should go without saying that you need to think about how many bikes you carry. Even if you’re buying the bike rack for your weekly jaunt with your friends, it’s going to be useful for the family vacation.
It’s not just the number of bikes you usually take; it’s how many you could take; it’s better to have a bike rack that is too big rather than one that is too small!
Alongside this, it is a good idea to think about if you can share vehicles with a friend and carry their bikes as well, making the weekend ride cheaper for both of you.
In addition, it is worth considering whether you’re likely to carry anything else at the same time. For example, there is little point in filling your roof with bikes when you will probably want to take a kayak or two as well, which will need the roof space.
Knowing what number of bikes you’ll carry and what else you may take at the same time can really help you to narrow your choices when choosing a bike rack.
Which Style Will Fit Your Vehicle
You will, of course, be limited by your vehicle. For example, if you have a truck, you’ll find that a truck bed rack is likely to be the only option available to you. Equally, vehicles with rear-mounted spare tires may struggle to find any other style of rack that will suit them.
While it is important to think about what vehicle you may get next, you need to consider the vehicle you currently have and which style of Yakima bike rack will fit your vehicle and your needs the best.
Knowing the style will simply narrow the playing field.
How Easy Is It To Mount?
There are two types of bike rack users; those who take them on and off as they need them and those who leave them. If you leave it on, then you’re not going to worry too much about how hard it is to put on; after all, you only have to do it once.
If you prefer to fit the rack as and when you need it, you’re going to want one that is very easy to fit. Hitch bike racks tend to be the easiest ones to fit, although they are generally heavier. Of course, you’ll need a receiver to add the hitch rack to your vehicle. While these can be fitted to any vehicle, you’ll need to decide how much extra this will cost and whether the expense is worthwhile.
Security
You’ll have noticed that some of these Yakima bike racks have built-in locking systems, and others need to have chains that are sold separately.
Security is a big issue, and it’s generally better to play on the safe side. For example, you may not worry about a lock as you always drive straight to the trails and back. But, the one time you decide you need to run in the store will be the one time that somebody takes your bike; it takes just a few seconds for it to disappear, and you’ll struggle to find it again.
If you’re really convinced that you won’t leave your bike unattended anywhere, then you may wish to avoid factoring security into the equation. But you may come to regret this; it’s definitely better to be safe than sorry.
Accessory Options
When you buy a Yakima bike rack, you’ll get everything you need to fit and use it. But that doesn’t mean you’ll have every accessory under the sun. There is a whole range of accessories that can be bought to accompany bike racks.
If you’re considering purchasing a less well-known brand of bike racks, you may want to check what accessories they have available; it may not be able to do something that you hope it will!
If you’re not sure what I mean, check out this list of accessories on Yakima; it will give you an idea regarding what is possible; you should never accept second best. It is worth specifically mentioned the Backswing because it is such a simple yet useful accessory:
This is technically a Yakima bike rack hitch accessory; it can’t carry the bike for you itself. However, it is a handy piece of kit and well worth a mention.
The Backswing is designed to convert a 2” hitch product into a swing-away rack. Unfortunately, it doesn’t work with 1.25” receivers yet. The idea is simple; you slide the hitch receiver end of this accessory into the receiver on your vehicle.
Then, drop the securing pin into position, ensuring that the Backswing can’t come back out of the receiver without you wanting it to.
The Backswing then has its own receiver, which your bike rack can slide into. The securing mechanism for your bike rack is the same as when just using the receiver on your vehicle. The difference is that the Backswing has a lever on the top of it, which allows the lower bar section to move while the hitch receiver stays locked into its socket.
In short, the bracket and any attached bike rack can then be swung away from your vehicle at an angle of 90°. All you need to do is pull the lever up and swing the rack out of the way of your vehicle. You can even lower the lever back down, effectively locking the bike rack into an open position.
The Backswing is designed to accommodate up to 250lbs; that’s more than enough for a standard bike rack and 4 bikes.
It is worth noting that this is an accessory and not the cheapest option n the market. It will convert your existing hitch bike rack into a swing-away one, but it is potentially cheaper to purchase a new Yakima bike rack. Therefore, it’s a good idea to consider the costs and why you need this accessory before you purchase it.
Of course, if it is the right thing for your needs, then you can’t go wrong with this offering from Yakima. It is well built and will last you for years.
As a final point, you may want to consider getting a locking pin for this accessory; the Backswing locks into position with a conventional pin, making it possible that someone could release it and steal your bike rack, even if the rack is locked to the Backswing! Yakima supply a locking pin which would prevent this from being an issue.
It will fit virtually any rack, and it does add approximately 12” to the length of your rack; this is worth noting when reversing but could be beneficial if you’re trying to mount a hitch-style bike rack to a vehicle with a spare tire on the back.
Trunk Accessibility
This is a critical consideration if you’re planning to leave the bike rack on all the time. It is also worth considering if you are planning a family vacation. It may seem like you’ll pack up the car and head on out, but how many times along the way will you wish you could get into the trunk?
Yakima bike rack hitch mounted is fantastic at letting you get to your trunk. A simple pull of a lever will swing or tilt the rack out of the way, safely allowing you access. Unfortunately, this is not always true of trunk-mounted racks as they will generally be too heavy for the hydraulics and leave you at risk of the boot falling on your head, even if you can get it open.
While looking at the trunk, it is also important to consider that most of the Yakima bike rack hitch-style models will block your registration plate from view. So you’ll need to invest in another plate and a board to mount it on, connected to your electrics to ensure anyone behind you knows what you are doing, specifically slowing down or turning.
The ay these boards fit can affect trunk access; consider this carefully before you commit to buying.
Reviews
Although Yakima has an excellent reputation, this is for the quality of its products. The fact is that no one can be certain how good a specific product will be until they use it. After all, there are always other factors that can influence the way something operates.
This is why it is essential to look at the reviews available regarding the specific Yakima bike rack that you’re hoping to purchase.
You can check out reviews on the Yakima site to assess the responses they have received. However, it is difficult to be certain that they show all their reviews; any company could publish good reviews.
That’s why you must pay a visit to social media sites and see what responses you get. Of course, there will be some negative reviews. After all, no company can get it right every time. The issue is how the reviews were dealt with by the manufacturer.
But, if most reviews are poor or bad, you’ll need to consider whether this is really the product you want to purchase or not.
Budget
The price of a Yakima bike rack can vary drastically. However, there is no doubt that the very simplistic bike block for truck beds is exceptionally cheap. This is because it is a simplistic, although effective, design and serves a particular purpose.
In contrast, the Yakima bike rack hitch mount option is a more complex piece of engineering and will serve many different types of vehicles, making them more expensive.
You’ll need to decide what budget you can afford before you start looking. But, it is also a good idea to consider how soon you’ll need the rack; the longer you can wait for, the more funds you’ll be able to save, and the more likely it is that you’ll get the bike rack that you really want.
Patience is a virtue; unless you’re heading away on vacation tomorrow and need any Yakima bike rack, you can get your hands on it.
Bike Attachment
It is worth taking a minute or two to check how your bikes are secured to a specific rack. You’ll probably have paid a significant sum for your bike, and you’ll want to protect it as best as possible.
This means making sure the rack is padded, the clamps are padded, and the bike really can’t move during transit. If you don’t verify and check these things before you buy, you find your bike paint is damaged after your first trip out; that will be frustrating.
That’s the real crux of the issue, each of the Yakima bike rack products available is well designed and made to a high standard; you can’t go wrong if you choose the one that best suits your needs, not just the one that everyone else thinks it fantastic.


